


Scope
CICD automation with AWS code pipeline + code deploy (EC2/on Premises, IAM, GitHub)
In this guide, we will build a code pipeline + code deploy setup that takes our commits from the GitHub repository for our source codes and deploys it automatically on our servers. The basic idea is to automate the CICD process, whenever there is a change/commit in the git repository, it will automatically deploy to the desired server.
Lets get started.
1. IAM roles and permissions:
We need to create few roles so that these services can talk to each other without any problem. As there are three services are involved. Code Pipeline, Code deploy, and Ec2, we need to create IAM roles for each service with their respective permissions.
The role for the code pipeline is automatically created while creating the pipeline. So we just need to create 2 roles manually.
- Ec2 role for CodeDeploy
- Service role for CodeDeploy.
Ec2 role for CodeDeploy
- Select the IAM Service in the drop-down list of AWS services in your console.
- Go to roles -> create roles ->EC2 -> Next

We will only select the role “Amazonec2roleforawscodedeploy”. Onece this role is created, we will attach this role with our deployment server (where we want to deploy the application).
NOTE: This role consists of permission to access specific S3 bucket. As per the CICD flow Ec2 instance talks to S3 buckets which is created by the code deploy to put all the revisions.
Service role for CodeDeploy
This time we will create a service role instead of an Ec2 role so that the CodeDeploy service can inherit all the related permission to run the tasks.
- Select the IAM Service in the drop down list of AWS services in your console.
- Go to roles -> create roles ->Codedeploy -> Next


This time we chose “AWScodeDeployrole” permission.
As for now, we have created 2 roles (Ec2 role, codedeploy role). We will create 3rd role while creating pipeline.
We assume that we have created our deployment instance as the steps to launch instance are straight forward.
2. Install Deployment agent on instance
Hence deployment agent is automatically install while setting up code deploy. If in the case this agent is not install automatically. Flowing are the steps to install it manually.
$ apt-get install ruby
$ wget https://aws-codedeploy-ap-south-1.s3.ap-south-1.amazonaws.com/latest/install$ chmod +x ./install$ ./install auto$ service codedeploy-agent statusReplace s3 path with your own s3 bucket path which is created when the code deploy is set up.
NOTE: Code deploy agent is a daemon which communicate with code deploy to deploy the builds.
3. Setup Code Deploy (AWS)
- Go to the CodeDeploy option in the AWS console.
- Click create an application.

Give the name and platform. In our case platform is ec2/on-premises. Aws provides other platforms like Lambda and Autoscaling.
Once the application is created, we create deployment group where we define our target server.


1. Here we define group name in the Deployment group name field.
2. In the service role we provide role which we have created role as a service.
3. In the Environment configuration, we define which platform we are going to use, In our case we 4. will check Amazon Ec2 Instance and in the value field, we provide the instance name on which we want to deploy the application.
Now, we can check the Load balancer option as shown in the figure below, as we are not using a Load balance environment.

Leave everything as as a default and click create deployment group.
Now our Deployment group is created, we need to create pipeline to complete our CICD flow.
4. Setup Code Pipeline (AWS)
Go to code pipeline and click “create pipeline” it will redirect to this page.

Enter pipe line name you wish to create and move to service role.
We will go with new service role, in this way new role with specific permission will be created.
Move to next.
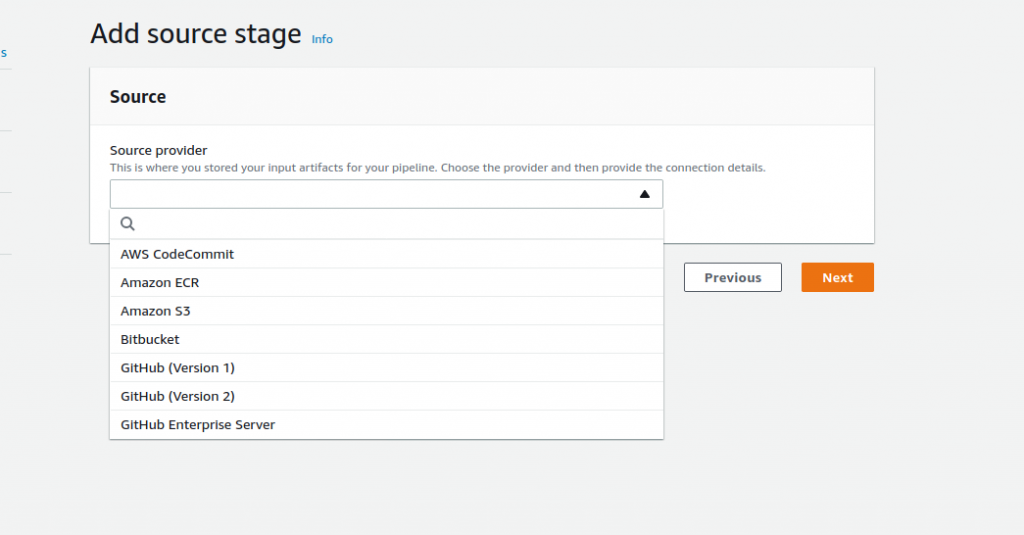
Here we will select our source code provider. In our case, our repository is GitHub, so we select GitHub (Version 2) as version 1 is deprecated and not recommended by AWS.
Once we have selected the GitHub, we need to make a connection for AWS to talk to GitHub.

Click create “connect to GitHub” button. It will redirect you to GitHub URL and ask you to enter your Git username and password. Once we provide the details, it will connect with GitHub.
In the next field we define our repository and then branch.
Next step is to create build setup which is not required, so we will skip this step.

In the next step, we will define our deployment platform. There are many platforms that AWS offers, but we will choose code deploy which we have created earlier.

Click next and our pipeline setup is completed.
Conceptual summary
The complete workflow is:
When someone commit/change in source code (GitHub), git hook is initiated and ping the code pipeline.
Code pipeline fetches the change and make a built and store it on AWS S3, then this build is passed to code deploy which is responsible to deploy the change on the target server.
Hence complete the CICD flow with complete automation.
But we are missing something here. As we have told the code to deploy the application on the target server. But we have not defined on which path this code should be deployed.
AWS code deploy does not provide any feature to define the absolute path. So, here comes the YAML file.
5. YAML File Configuration
Before starting the build,we created YAML file with the name “appspec.yml” and define our configuration there. This file must be the part of every build as this file decide where to put the application and what task to be performed on the application after deploy.
The basic syntax of the file is as follows:

See the link below to understand every step of the appspec file:
https://docs.aws.amazon.com/codedeploy/latest/userguide/reference-appspec-file.html
NOTE: If you get errors it means you have done something wrong. So how do you troubleshoot:
You can ssh into your Server and navigate to this path /var/log/aws/codedeploy-agent/codedeploy-agent.log to see a log of the deployment